Getting Started
Bootstrapping an automation project with Qadenz is as simple as starting a new Java/Maven project, adding a dependency, and building a simple test. This guide will run through the pre-requisites, and show how to build a simple first automated test that verifies the functionality of an authentication form.
The Foundation
Before we dive into a fresh project, let us first make sure we have the necessary tooling in place to do so.
Being a Java project, we’ll need a JDK. Qadenz is currently built with JDK 11, so an equivalent or newer version must be installed. Next is an IDE. This is completely a preference-based decision, but with the prevalence of IntelliJ IDEA, it is strongly recommended. The Community Edition is free to use and will be sufficient for automation development with Qadenz. Most IDEs come with Maven bundled, and IntelliJ is no different. This is perfectly functional, but can be known to exhibit some different behavior in certain situations than a native installation. It is recommended to install the latest Maven and configure the IDE to use the native instance instead of the bundled version. Finally, ensuring IDE support for things like TestNG and Maven can make working with these tools very convenient.
Next, since this is a test automation project, we’ll need to make sure some related tooling is in place. Qadenz is built to use the RemoteWebDriver, so the Selenium Server is a necessity. Chromedriver and the Chrome browser itself will also need to be in place. Other browsers are certainly supported, Chrome is simply a good starting point due to it’s dominant market share.
Package managers are a great way to install and update development tools. In a Windows environment, Chocolatey is a good option. For Mac, Homebrew is a great choice. Linux distros will have their own package systems baked in, and these tools are typically available through official repos.
The Framing
In the IDE, start a fresh Maven project. Open the pom.xml file and add the dependency information for Qadenz.
<dependency>
    <groupId>dev.qadenz</groupId>
    <artifactId>qadenz</artifactId>
    <version>2.0.0</version>
</dependency>
Next, create a Package and Class that can hold our first test, which will exercise the Form Authentication page at Heroku’s The-Internet app. To ensure this new class is recognized as an ran as a Qadenz Test Class, the class must extend AutomatedWebTest.
package com.herokuapp.theinternet;

public class FormAuthenticationTest extends AutomatedWebTest {

}
The Fixturing
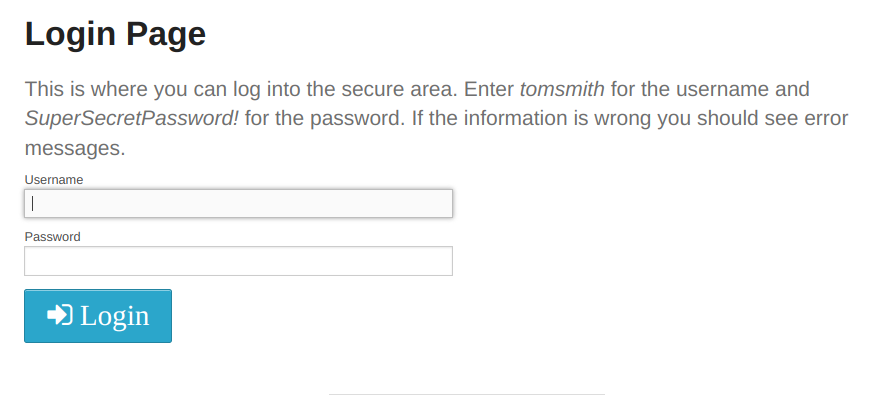
Our first test will be to complete the form with a valid username and password, click ‘Login’, and verify the confirmation text that indicates successful authentication.
Let’s first take a peek at the Form Authentication page. In order to complete the test, we need to map the Username and Password fields, and the Login button.
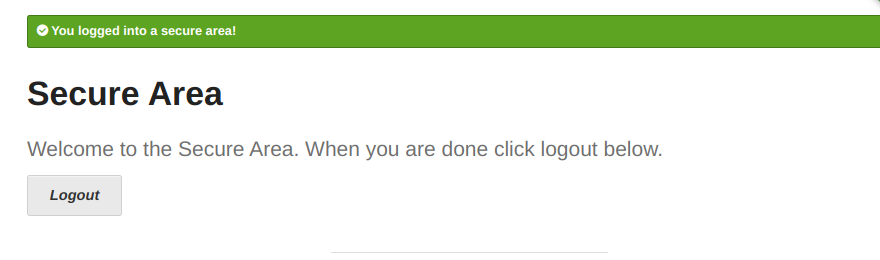
Then, in the Secure Area, we’ll need to map the banner in order to verify the message.
On the FormAuthenticationTest class, create Locators for the elements with which the test will interact.
private Locator usernameField = new Locator("Username Field", "#username");
private Locator passwordField = new Locator("Password Field", "#password");
private Locator loginButton = new Locator("Login Button", "#login .fa-sign-in");

private Locator bannerMessage = new Locator("Banner Message", "#flash");
Locator is being used in a simple way just to define the elements required for this exercise.
Next, add the test method. A WebCommander instance is created and commands are invoked to interact with the form and complete the steps of the test.
@Test
public void testAuthenticationSucceedsWithValidCredentials() {
    WebCommander commander = new WebCommander();

    commander.enterText(usernameField, "tomsmith");
    commander.enterText(passwordField, "SuperSecretPassword!");
    commander.click(loginButton);
    commander.verify(Conditions.directTextOfElement(bannerMessage,
            Expectations.isEqualTo("You logged into a secure area!")));
}
And finally, add a TestNG Suite XML file at the project root. The required parameters will tell Qadenz which browser to use for the test, the URL of the application, and where to find the Selenium Server.
<!DOCTYPE suite SYSTEM "https://testng.org/testng-1.0.dtd" >

<suite name="Qadenz Quickstart" verbose="1" thread-count="1">

    <parameter name="browser" value="chrome"/>
    <parameter name="appUrl" value="https://the-internet.herokuapp.com/login"/>
    <parameter name="gridHost" value="127.0.0.1"/>

    <test name="Login Test">
        <classes>
            <class name="com.herokuapp.theinternet.FormAuthenticationTest">
                <methods>
                    <include name="testAuthenticationSucceedsWithValidCredentials"/>
                </methods>
            </class>
        </classes>
    </test>

</suite>
The coding portion is now complete, the next step is to run the test and view the results.
The Finishing
Before the test can be launched, a Selenium Server must be started. When running tests locally, this can be easily done by launching the server in standalone mode. Open a command prompt and change to the directory where the Selenium Server jar is located, then run the following command…
java -jar selenium-server-4.10.0.jar standalone
Next, return to the IDE, right click the TestNG Suite XML file, and select Run. The suite will run, a browser will be launched, and the test will be executed. Once complete, the Logs and HTML Report will be available for review.
Console Logs
In the IDE, the console will display logs captured by the test run. The console logs will contain output from the SUITE logger, which shows information about the Suite in progress. This will include data such as XML <parameter> values, browser configuration arugments, and which test methods are being ran.
The TEST logger will show information from the actual test. For the login test, the following will be displayed…
21:06:57:620 | Thread: main | INFO | WebCommander | Entering text [tomsmith] into element [Username Field].
21:06:57:798 | Thread: main | INFO | WebCommander | Entering text [SuperSecretPassword!] into element [Password Field].
21:06:57:893 | Thread: main | INFO | WebCommander | Clicking element [Login Button].
21:06:58:149 | Thread: main | INFO | Commands | Verifying Condition - Direct text of element [Banner Message] is equal to [You logged into a secure area!].
21:06:58:274 | Thread: main | INFO | Commands | Result - PASS
Each line will contain a timestamp, a thread identifier, the logging level, the name of the logger, and the log message showing the details of each step of the test.
HTML Reports
Qadenz has a built-in HTML reporter that presents the logs from each test in a browser along with screenshots of failed validations and caught exceptions. The suite-results.html file is located in the test-output directory at the project root alongside the reports generated by TestNG.
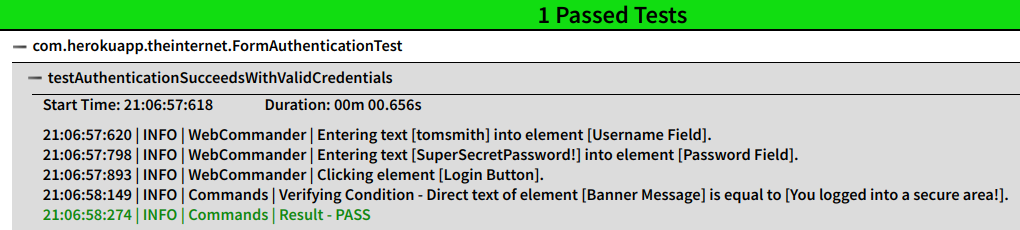
The HTML report sorts test methods by result, then groups by class. Screenshots are embedded directly into the HTML as Base64 encorded Strings, which makes sharing test results extremely simple.
Feedback
Was this page helpful?
Glad to hear it! Please tell us how we can improve.
Sorry to hear that. Please tell us how we can improve.